Video 47 is sitting in my YouTube channel right now, and it has 340 views. Not because the content was bad. Not because the thumbnail was wrong. It has 340 views because within the first 15 seconds, three separate people in the comments told me the audio sounded like I recorded it inside a parking garage.
They were right. I was filming phone reviews in a room with hard walls and no acoustic treatment, using nothing but my iPhone’s built-in microphone, sitting about two feet away from the camera. The result was echo, room noise, and a slightly hollow quality that broadcast “amateur” louder than anything I said in the actual video.
I spent the next two weeks reading about microphones before someone in a creator Facebook group said three words that changed everything: “Just get Mini Mic.”
Five months later, here’s the complete honest story of what the Mini Mic Pro actually does, what it doesn’t do, and whether the #1 microphone claim it carries is justified or marketing inflation.
What the Mini Mic Pro Actually Is
Before anything else—this is a wireless lavalier microphone system. Not a USB desktop condenser. Not a boom mic. Not something that sits on a stand pointing at your face.
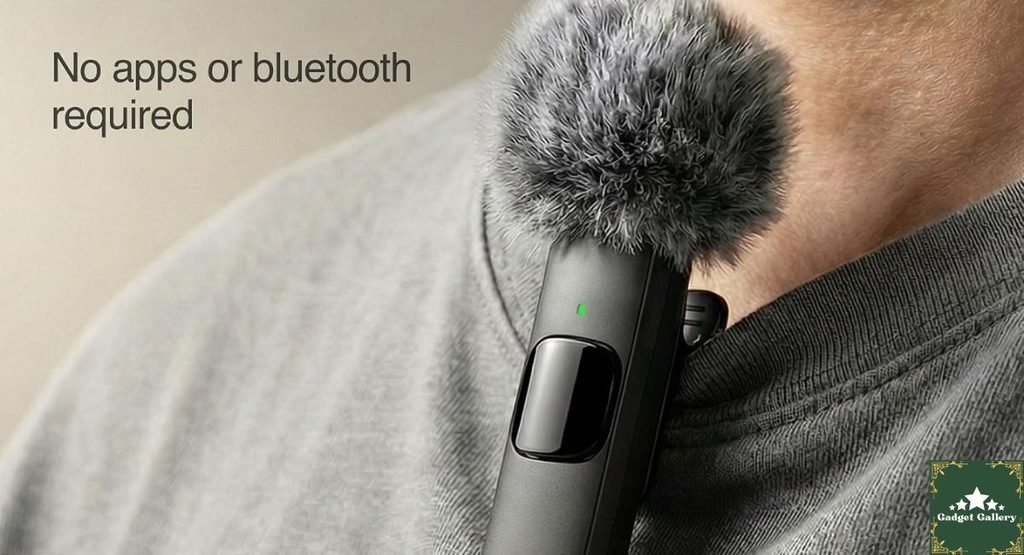
It’s a transmitter you clip to your collar and a receiver that plugs directly into your iPhone’s Lightning port or USB-C port (depending on model) or your Android phone’s USB-C port. No Bluetooth pairing. No app. No adapter. The transmitter is on you, the receiver is in the phone, and everything in between is handled automatically.
The “wireless” in the name refers to the connection between your body (transmitter) and your phone (receiver). The receiver itself is physically connected to your phone. This distinction matters, and I’ll come back to it.
The latest model includes noise cancellation processing in the receiver—the device actively filters ambient noise from your voice signal before it hits your phone’s recording software.
Setting It Up: The First Five Minutes
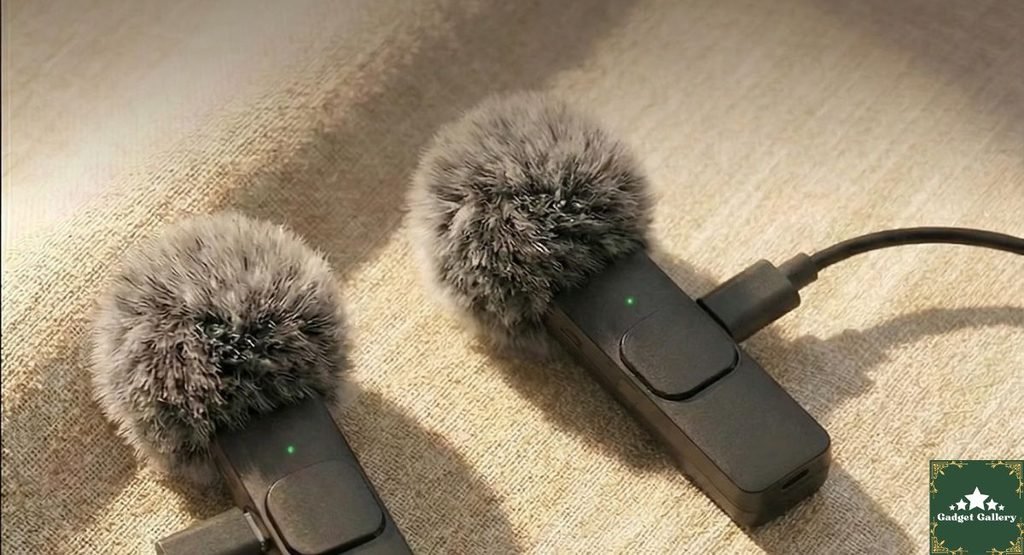
Opening the box: transmitter (the clip-on unit), receiver (the phone-mounted unit), magnetic charging case that holds both, and a short USB-C cable for charging the case.
How to use it, step by step:
- Charge the case via the USB-C cable until the indicator shows full
- Open the case—both transmitter and receiver charge automatically when stored
- Remove both units—they power on automatically when removed from the case
- They pair to each other automatically—no Bluetooth menu, no pairing code, no waiting
- Plug the receiver into your iPhone’s Lightning or USB-C port
- Open your camera app—audio is now routing through the Mini Mic Pro
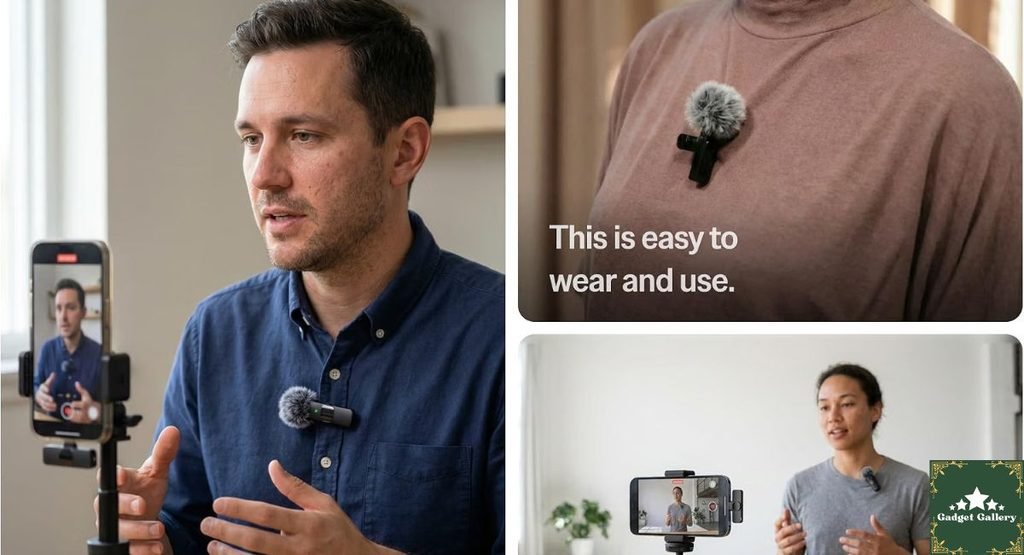
- Clip the transmitter to your collar, shirt lapel, or tie
- Record
That is the entire setup process. I timed it during my first use: 3 minutes and 20 seconds from opening the box to recording my first test clip.
The first time I heard my voice back through this microphone on playback, the difference from my previous built-in microphone recordings was not subtle. My voice was centered, present, and clear. The room—which had been a constant background presence in my previous recordings—was noticeably reduced.
Five Months of Real Creator Use: What I Actually Tested
I’ve used the Mini Mic Pro across five distinct content creation scenarios. Here’s what each one taught me.
Scenario 1: Talking-Head Product Reviews (My Main Content)
This is what I bought it for and where it performs best.
Clipped to my collar, the transmitter sits approximately 8-10 inches from my mouth during normal posture. The proximity advantage is the same reason professional news anchors wear lavalier mics—your voice is the dominant signal at that distance, and the room becomes secondary.
The noise cancellation processes the remaining ambient noise—my PC fans, street noise from the window, and the occasional sound from other rooms. It doesn’t eliminate everything, but it removes the constant background hum that previously required noise gate plugins in my editing software (I use DaVinci Resolve) to manage.
My editing workflow before Mini Mic Pro: record audio → import → apply Fairlight noise reduction → reduce room tone → normalize levels → sometimes re-record sections that were too contaminated by ambient noise. About 25 minutes of audio work per video.
After Mini Mic Pro: record audio → import → normalize levels → done. About 4 minutes. I got back 20+ minutes of production time per video. Across the 40+ videos I’ve made since, that’s a meaningful reduction in editing overhead.
Scenario 2: TikTok Street Content
I tried using it for outdoor street-style content—walking and talking while filming on my iPhone.
Outdoors is where wireless lavalier microphones show their biggest advantage over built-in phone mics. A phone mic picks up wind noise, crowd noise, and traffic from all directions simultaneously. A collar-mounted mic focuses on voice and reduces the directional noise problem dramatically.
Wind is still an issue at speed—walking fast or in direct wind creates noticeable wind noise on the transmitter. Mild outdoor conditions are fine. Moderate wind requires the small foam windscreen cover (check if it’s included in your package or purchase a compatible windscreen separately—it’s worth $5).
Street content at walking pace in moderate outdoor conditions: genuinely excellent. Wind conditions above a light breeze: plan around it or use a windscreen.
Scenario 3: Interview Content With a Second Subject
The Mini Mic Pro transmitter clips to the interviewee, while the receiver stays plugged into my phone. This creates a functional interview recording setup where the subject’s voice is captured directly rather than across a table.
I tested this for two interview-style videos where I spoke with local business owners. Their voices came through clearly and naturally. My voice—coming from across the table, picked up partly by the transmitter’s ambient pickup—was softer but present.
Limitation: This is a one-person primary mic system. It captures one voice with lavalier proximity quality and everything else at room ambient level. For proper two-person interview recording where both voices need equal quality, you’d need two Mini Mic Pro units or a dual-channel recorder.
For casual interview content where one person is the primary subject, the Mini Mic Pro handles it acceptably.
Scenario 4: YouTube Shorts Filming While Moving
YouTube Shorts content that involves demonstration—hands-on product content, cooking, DIY—requires audio while your hands are occupied with the subject matter.
This is where the hands-free collar clip design genuinely shines. The transmitter stays clipped while my hands are free to work. No boom mic positioning, no fixed desk setup, no holding a microphone while also trying to demonstrate something.
I filmed an entire Shorts series of quick phone accessory demonstrations using this setup over six weeks. The audio consistency across all of them was the cleanest audio I’d produced in 18 months of content creation.
Scenario 5: Podcast-Style Audio on Android
I tested the USB-C version on a Samsung Galaxy S25 for recorded conversation content.
Android recognition was immediate—plugged in, the recording app saw it as an external microphone, and recording began. No configuration.
The Redragon keyboard has Android-compatible remote features, the Mini Mic Pro has Android-compatible audio input, and the setup on Android was as frictionless as iOS. This matters because many creator accessories are quietly worse on Android despite claiming universal compatibility. This one actually works equally well.
The Noise Cancellation: Honest Testing Results
“Noise cancelling” is one of those terms that gets applied to everything from $8 earbuds to $400 professional recording equipment, covering dramatically different levels of actual performance.
Here’s what the Mini Mic Pro’s noise cancellation actually does and doesn’t do:
What it handles well:
Constant background noise—HVAC hum, PC fans, refrigerator hum, distant road noise, and air conditioning. These steady-state frequencies are what algorithmic noise cancellation processes most effectively. In my home office recordings, the constant fan and vent noise went from clearly audible to near-invisible in processed recordings.
What it handles moderately:
Intermittent ambient noise—occasional car passing, someone talking in another room, light street noise. These appear briefly in recordings but at a reduced level compared to an unprocessed phone microphone.
What it doesn’t handle:
Sudden loud sounds—dog barking, door slamming, immediate nearby talking. These pass through because the algorithm can’t predict or cancel unexpected audio events. This is true of all noise cancellation systems—it processes patterns, not individual events.
The noise cancellation is genuine and useful. It is not studio isolation. Setting appropriate expectations matters for not being disappointed.
The Wireless Range: How Far Can You Actually Go?
The Mini Mic Pro uses a 2.4GHz wireless connection between transmitter and receiver. The advertised range is typically cited around 20-30 meters line of sight.
My practical testing:
Same room, no obstacles: Perfect audio at any distance across a normal room (tested to about 25 feet).
Through one interior wall: Audio maintained with occasional very brief micro-dropouts—acceptable for most content.
Through two interior walls: Connection became unstable with audio dropouts every 30-60 seconds—not suitable for recording.
Practical conclusion: The Mini Mic Pro works well in the same room and has enough range for most content creator scenarios. It’s not designed for situations where you need to be in a separate room from the camera—for those scenarios, a longer-range dedicated wireless system is the right tool.
For 95% of content creator use cases—the camera is nearby and you’re in the same space—the range is entirely sufficient.
The Charging Case: A Design Detail That Matters
The magnetic charging case is one of the Mini Mic Pro’s best design decisions and one that doesn’t get enough attention in reviews.
Both the transmitter and receiver store magnetically in the case, charging automatically when stored. The case itself charges via USB-C.
Battery life in real use:
Case fully charged: I’ve gone nine days of daily recording sessions (approximately 2-3 hours per day) without charging the case. The internal battery of the case provides multiple charge cycles for both devices before the case itself needs recharging.
Individual transmitter and receiver: approximately 7-8 hours of active use per charge, replenished each time they’re stored in the case.
In practice, I charge the case once per week and never think about individual device batteries because the case handles it. This is the right design—charging accessories individually is friction that disappears when a case manages it automatically.
Mistakes I Made—Learn From Mine
Mistake 1: Not checking transmitter placement for clothing noise. The first recording session, I clipped the transmitter directly to a zip-up hoodie. Every time I moved, the transmitter picked up the fabric rubbing against it as a rustling sound. The fix: clip to a collar, lapel, or the V of a shirt—somewhere fabric movement is minimal. If you must clip to a thin t-shirt collar, a small piece of foam or fabric between the clip and the collar reduces rubbing noise.
Mistake 2: Leaving the transmitter too close to my mouth. I initially clipped it at the center collar, about 6 inches from my mouth, expecting more presence would be better. Instead, the close proximity made breath sounds more prominent. Moving it down to 9-10 inches below the mouth (upper chest area) improved the balance between voice presence and breath management.
Mistake 3: Forgetting the transmitter was active when stepping away from the frame. During a break in recording, I walked into the kitchen and had a conversation. The transmitter picked up the entire thing clearly, and it ended up in my recorded audio file. Now I touch the transmitter’s mute button before walking away from the camera. Build the habit early.
Mistake 4: Recording in Bluetooth mode instead of wired. Some users think the wireless system means you shouldn’t need anything plugged into the phone. The transmitter is wireless from the body—the receiver physically plugs into the phone. I saw a question about this in a forum before I bought mine, confirmed it, and avoided the confusion. The receiver-to-phone connection is wired. That’s normal and correct.
Who Should Buy the Mini Mic Pro
Buy this without hesitation if you:
Create TikTok, YouTube Shorts, or Instagram Reels content regularly and film on your phone. The clip-on wireless design and immediate plug-in connection make it the most friction-free mobile creator audio solution available.
Are a solo content creator who doesn’t have a dedicated recording space with acoustic treatment. The noise cancellation meaningfully reduces the room-quality problem that all non-studio recordings face.
Do interview or street content where you need hands-free audio while moving or working with a subject. Fixed desk microphones cannot do what a collar-mounted wireless transmitter does for mobile content.
Want to eliminate audio post-processing from your video editing workflow. If you spend 20+ minutes per video on audio cleanup, this microphone eliminates most of that work.
Are a journalist, podcaster, or educator who records commentary, explanations, or interviews on a phone or laptop and needs reliable, clear voice capture.
Consider alternatives if you:
Record in a professionally treated studio with a dedicated microphone setup—a desktop condenser will outperform any lavalier system for stationary recording environments.
Need broadcast-quality audio for professional productions—professional lavalier systems from Rode, DJI, or Sennheiser serve production-quality requirements that exceed what this price tier delivers.
Regularly do two-person interviews where both voices need equal lavalier-quality capture—you’d need two units or a dual-channel system.
Pros and Cons
Pros
Genuine noise cancellation that reduces constant ambient noise (HVAC, fans, background hum) to near-inaudible levels in recordings
The magnetic charging case manages the battery for both devices automatically—charge the case weekly, and never worry about individual battery levels.
Truly plug-and-play—no app, no Bluetooth pairing, no configuration; transmitter and receiver auto-pair when removed from case.
Universal phone compatibility—Lightning (older iPhone) and USB-C (iPhone 15+ and Android) cover the current phone landscape.
Hands-free collar mount enables content creation while moving, demonstrating, or interviewing.
Compact, pocket-sized—transmitter and receiver fit in the case easily in any bag or pocket.
Immediate audio upgrade visible from the first recording—most creators see measurable improvement in audio quality within their first session.
Simplified editing workflow—most users significantly reduce audio post-processing time after switching from built-in phone microphones
Cons
The receiver physically plugs into the phone—the system is wireless from body to phone, not phone to camera; some users expect fully wireless before reading carefully.
Wind is a challenge at speeds above a light breeze—foam windscreen recommended for outdoor content in variable conditions.
One primary voice capture—the single transmitter captures one voice with lavalier quality; two-person equal-quality capture requires two units.
Wireless range through walls is limited—same-room performance is excellent; multi-room separation causes dropouts.
Clothing noise requires attention—clip placement and fabric type affect how much movement noise enters the recording.
Not a studio replacement—excellent for mobile creator content; doesn’t match the quality ceiling of professional recording setups
FAQs
Q: Does the Mini Mic Pro work with the iPhone 15 and newer USB-C iPhones? A: Yes. The latest Mini Mic Pro model is available in a USB-C version that plugs directly into iPhone 15, 16, and 17 and any USB-C iPhone model. The Lightning version is for iPhone 14 and older. Purchase the correct version for your phone model.
Q: Do I need an app to use the Mini Mic Pro? A: No. The Mini Mic Pro is completely plug-and-play. Plug the receiver into your phone, and your camera app, voice memo app, TikTok, Instagram, and any other recording application automatically use it as the audio input. No app, no configuration, no account.
Q: Can I use this for Zoom or Teams video calls? A: Yes. Any app that uses your phone’s microphone input will use the Mini Mic Pro when it’s connected. This includes Zoom, Teams, FaceTime, Google Meet, and phone calls. The noise cancellation is active for all applications.
Q: How do I know the transmitter is active and recording? A: The transmitter has an LED indicator that shows active status. Refer to your specific model’s user guide for the indicator color meanings—typically solid light means active, and blinking means low battery or pairing mode.
Q: Is the noise cancellation always on, or can I turn it off? A: The noise cancellation is processed by the receiver hardware automatically. Most Mini Mic Pro users cannot manually toggle noise cancellation on/off—it’s an always-active feature of the latest model receiver.
Q: What’s the actual battery life per charge? A: The transmitter and receiver each provide approximately 7-8 hours of active recording per charge. The charging case provides multiple complete charge cycles before needing to be charged via USB-C. In real daily use with the case management system, most creators charge the case once per week.
Q: Can I use this for recording music? A: The Mini Mic Pro is optimized for voice capture—speech, commentary, interviews, and similar vocal content. For recording singing or musical instruments, a dedicated music recording microphone with appropriate frequency response would serve better. For voice-over-music content creator scenarios, the Mini Mic Pro handles the voice component correctly.
Final Thoughts
Video 47 with 340 views sits in my archive as a reminder of what content sounds like without a dedicated microphone. The videos after it—starting from the week I got the Mini Mic Pro—sound noticeably different. Not professionally studio different, but confidently creator-grade different.
The #1 microphone for iPhone claim on the packaging is marketing. What’s actually true underneath the marketing is more useful: this is one of the most practical, friction-free audio upgrades available to phone-based content creators at this price point.
If you film content on your phone and you’ve ever had someone comment on your audio quality in a way that made you wince—this is the fix that works and that you’ll actually use because setup is three minutes and it requires zero workflow change beyond clipping something to your collar.
I’ve recommended it to six creator friends since buying mine. All six are still using it. That’s the endorsement that matters more to me than anything I could write in a review.
Where to Buy
🛒 Check Current Mini Mic Pro Price on Amazon →
Related Reviews Worth Reading
- USB C Lavalier Microphone Review—Wired lavalier alternative for direct USB-C connection
- Apple EarPods USB-C Review — Apple’s built-in mic option for comparison
- EMEET C960 1080P Webcam Review—Upgrade your video quality alongside your audio
- Sony MDR-ZX110 Wired Headphones Review—Monitor your audio during recording
- WHOOP 5.0 MG Activity Tracker Review—Creator lifestyle wearable companion
👉 Subscribe to @5stargadgetgallery on YouTube—weekly creator gear reviews and honest audio tests. Subscribe and hit the notification bell so you never miss a review!
🌐 Build Your Own Creator Review Blog
This site runs on Hostinger—the hosting platform I’ve used from day one because it makes launching and maintaining a content creator review site genuinely manageable.
- Plans start at $2.99/month
- Free domain name for year one
- One-click WordPress installation
- Fast servers that handle video-embedded review content
- 24/7 live chat support in plain English
Launch your creator gear review blog with Hostinger.
Disclosure: This article contains Amazon Associates affiliate links. As an Amazon Associate, I earn from qualifying purchases at no additional cost to you. The Mini Mic Pro was personally purchased and used for five months of active content creation before writing this review. All findings, test results, and opinions are entirely my own.